
Requests and Queues
A request is a decision a workflow is waiting for. When a run reaches a Wait for Signal step, it pauses, keeps its progress, and waits until someone answers. The answer becomes the step’s output and the run continues from there.
A queue is a saved, team-shared list of one workflow’s requests (or runs) with the columns, filters, sorting, and answer buttons your team needs. Queues hold no logic: deleting one never touches workflows, runs, or open requests.
This page uses a real example: a Purchase order approval workflow that records each incoming order, auto-approves orders up to 1,000, and asks a person to approve or reject anything larger.
Make a workflow ask for a decision
A run shows up in Requests and Queues when it waits on a Wait for Signal step that has an Action Key. Without an action key, the run still pauses and can be answered from its run page, but it does not appear in Requests or Queues.
In the workflow editor:
- Add a Wait for Signal step where the workflow needs a person. Name it after the decision, for example Approve purchase order. The step name becomes the request label everywhere in Operations.
- Under Response Schema, add the fields the person fills in. In the example, decision is a required text field with the allowed values
approveandreject, and reason is a text field that becomes required when the decision isreject. - Optional: set Timeout (ms). If nobody answers in time, the step fails. Leave it empty to wait indefinitely.
- Open Advanced Settings and set Action Key, a stable name for this kind of decision, for example
po_approval. Keep it the same across versions so existing queues keep working. - Optional, in the same section: Action Context adds read-only details, such as the amount and supplier, that are shown next to each request.
Later steps read the answer from the step’s outputs, for example steps.review.outputs.decision.
Publish state for columns and filters
Queue columns, filters, sorting, the stage stepper, and due dates come from the run’s state: a small set of named values a run publishes as it goes.
- In the workflow editor, open Settings and define the State fields the run exposes. The example uses PO number, Supplier, Amount, Stage (with the allowed values
received,awaiting_approval,approve,reject,auto_approved), and Due (a date-time). - Add Set State steps that write those fields: one at the start to record the order, and one after the decision to record the outcome.
A field with a list of allowed values can drive the stage stepper on the run page. A date-time field can drive due dates.
Answer requests
There are three places to answer, and they all send the same answer:
- On the run page. Select Review request on the Overview or Requests page, or open the run from Runs. The Decision needed card shows a form built from the response schema. Fill it in and select Send decision.
- In a queue, one row at a time. If the queue has an Inline answer field, each row shows one button per allowed value, for example Approve and Reject. A click sends the answer immediately. If the answer needs more fields, the row expands into the full form.
- In a queue, in bulk. If the queue allows bulk answers, select rows with the checkboxes and choose Approve selected (or another value).
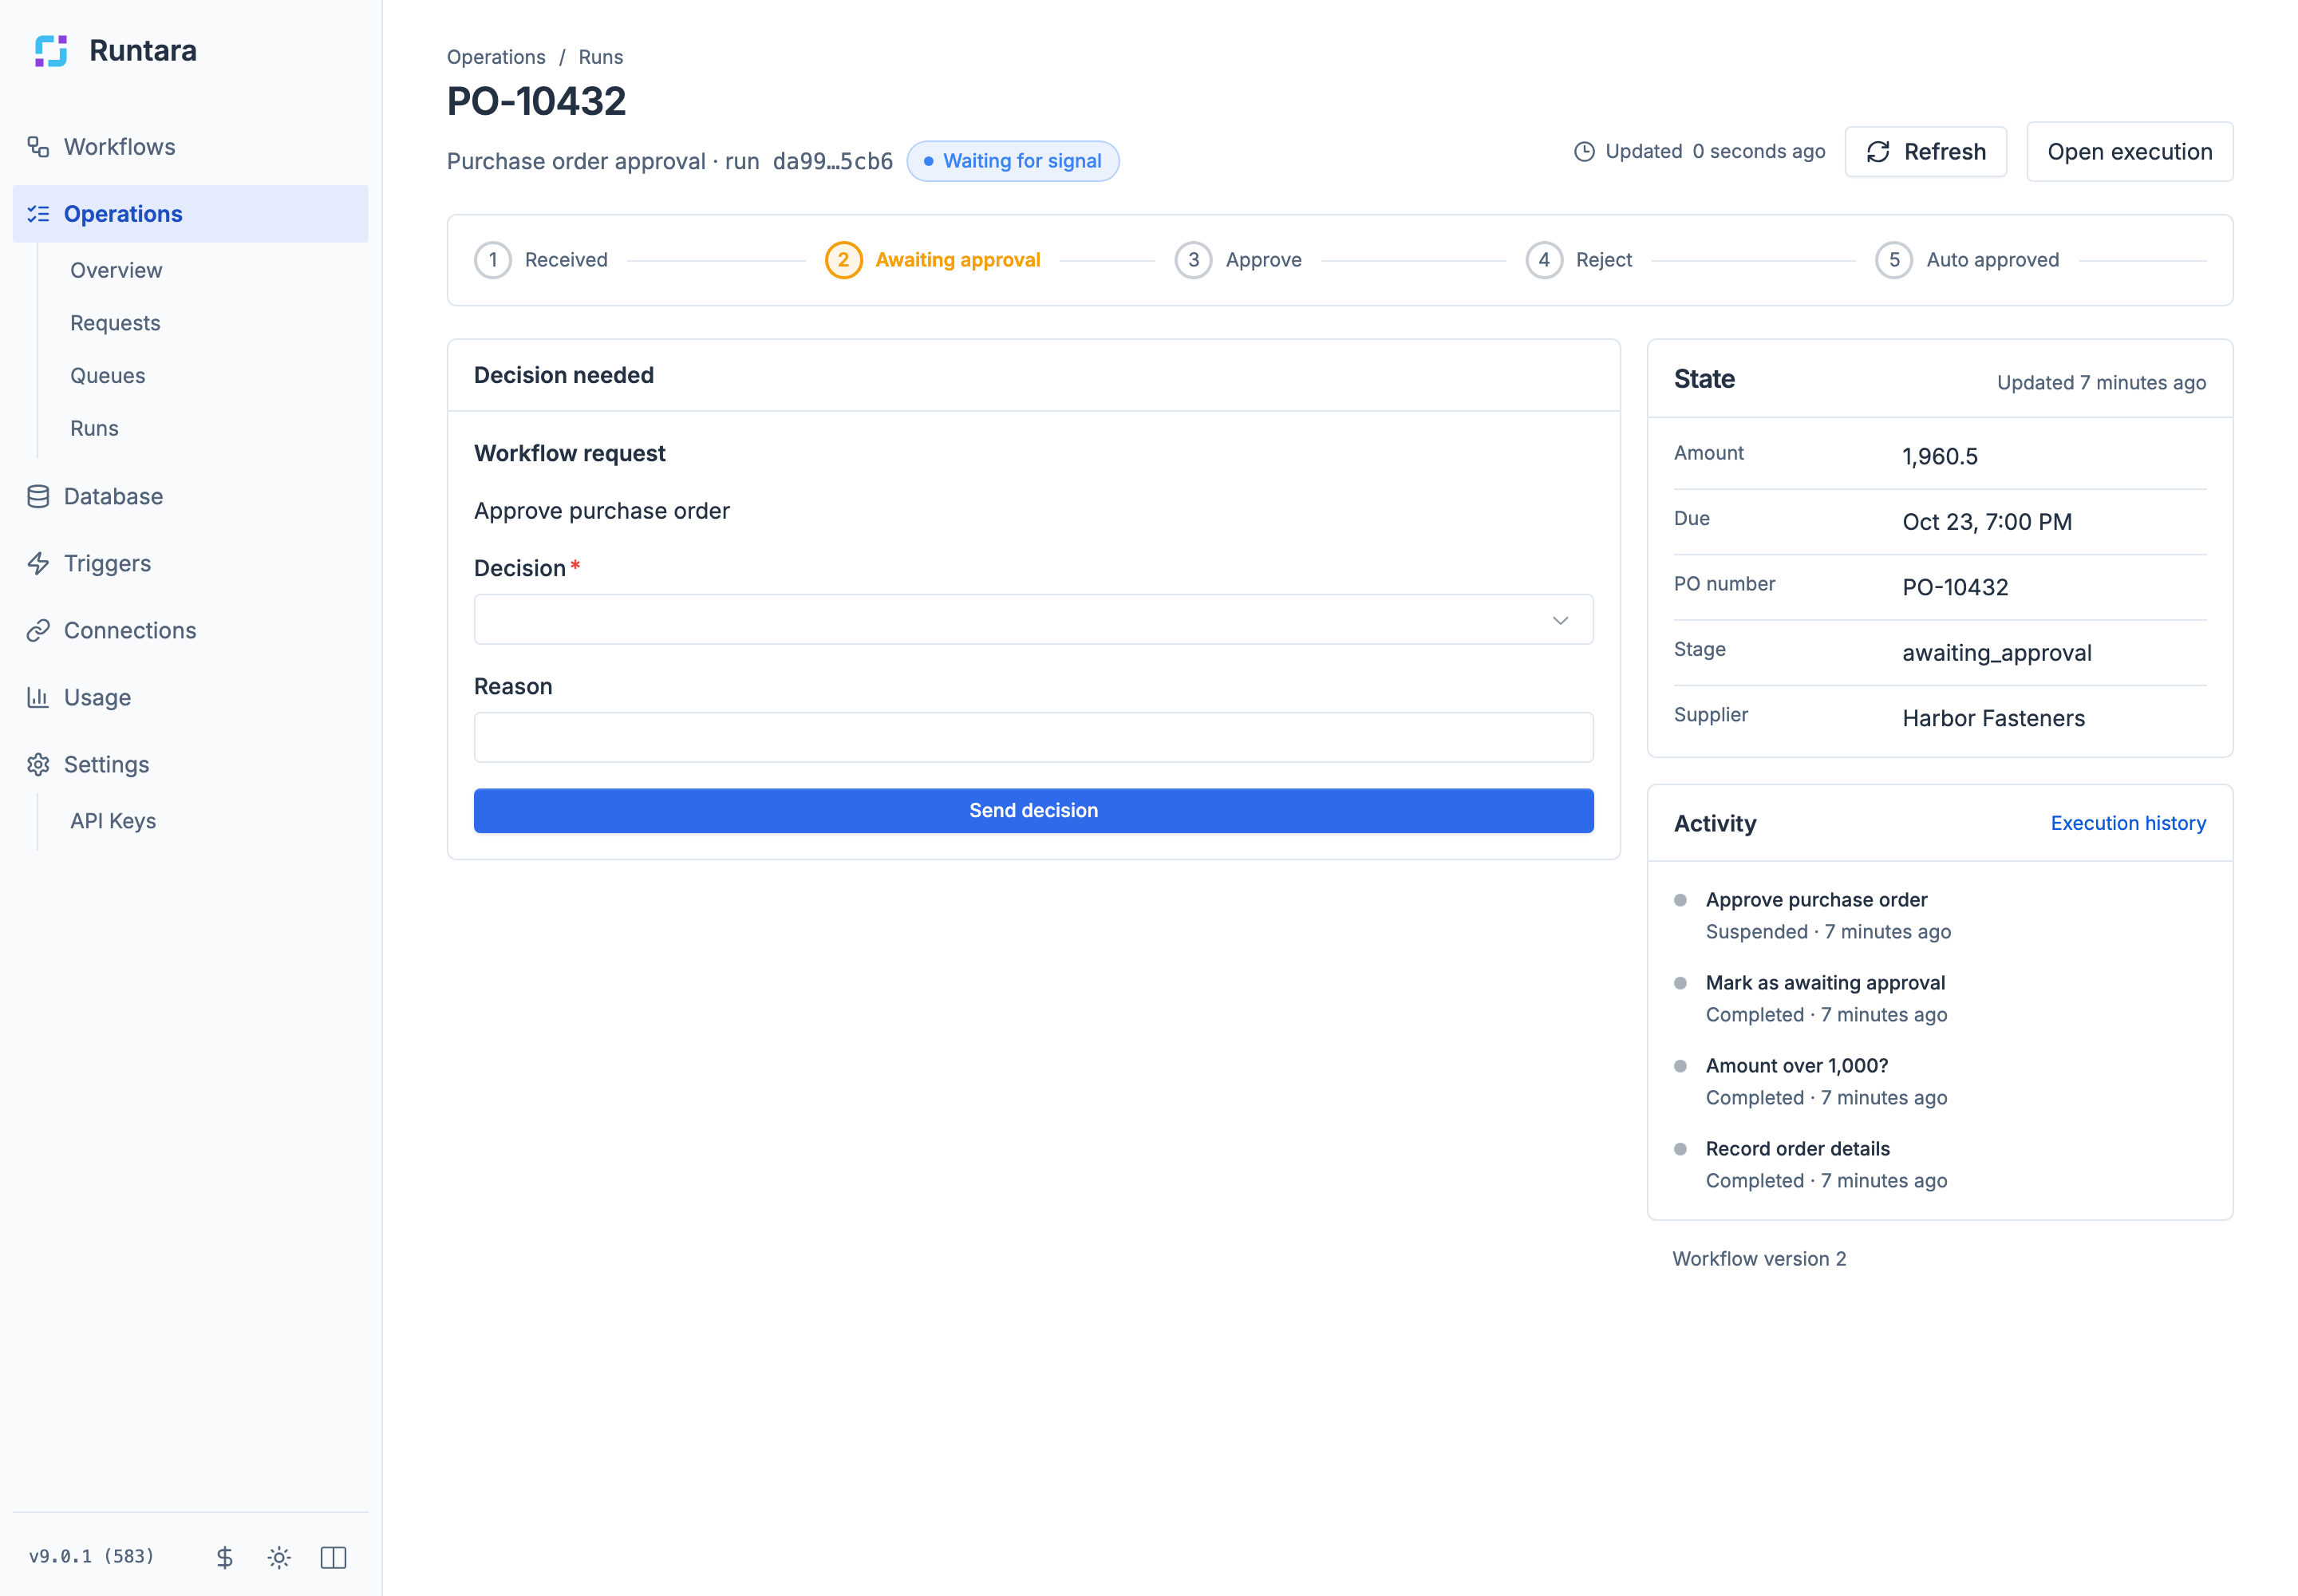
The form validates your answer before sending it: required fields, allowed values, minimum lengths, and fields that become required because of another answer. The server checks the same rules again.
When the answer is accepted, you see Response accepted, the row shows Answered, the request leaves every list, and the run continues.
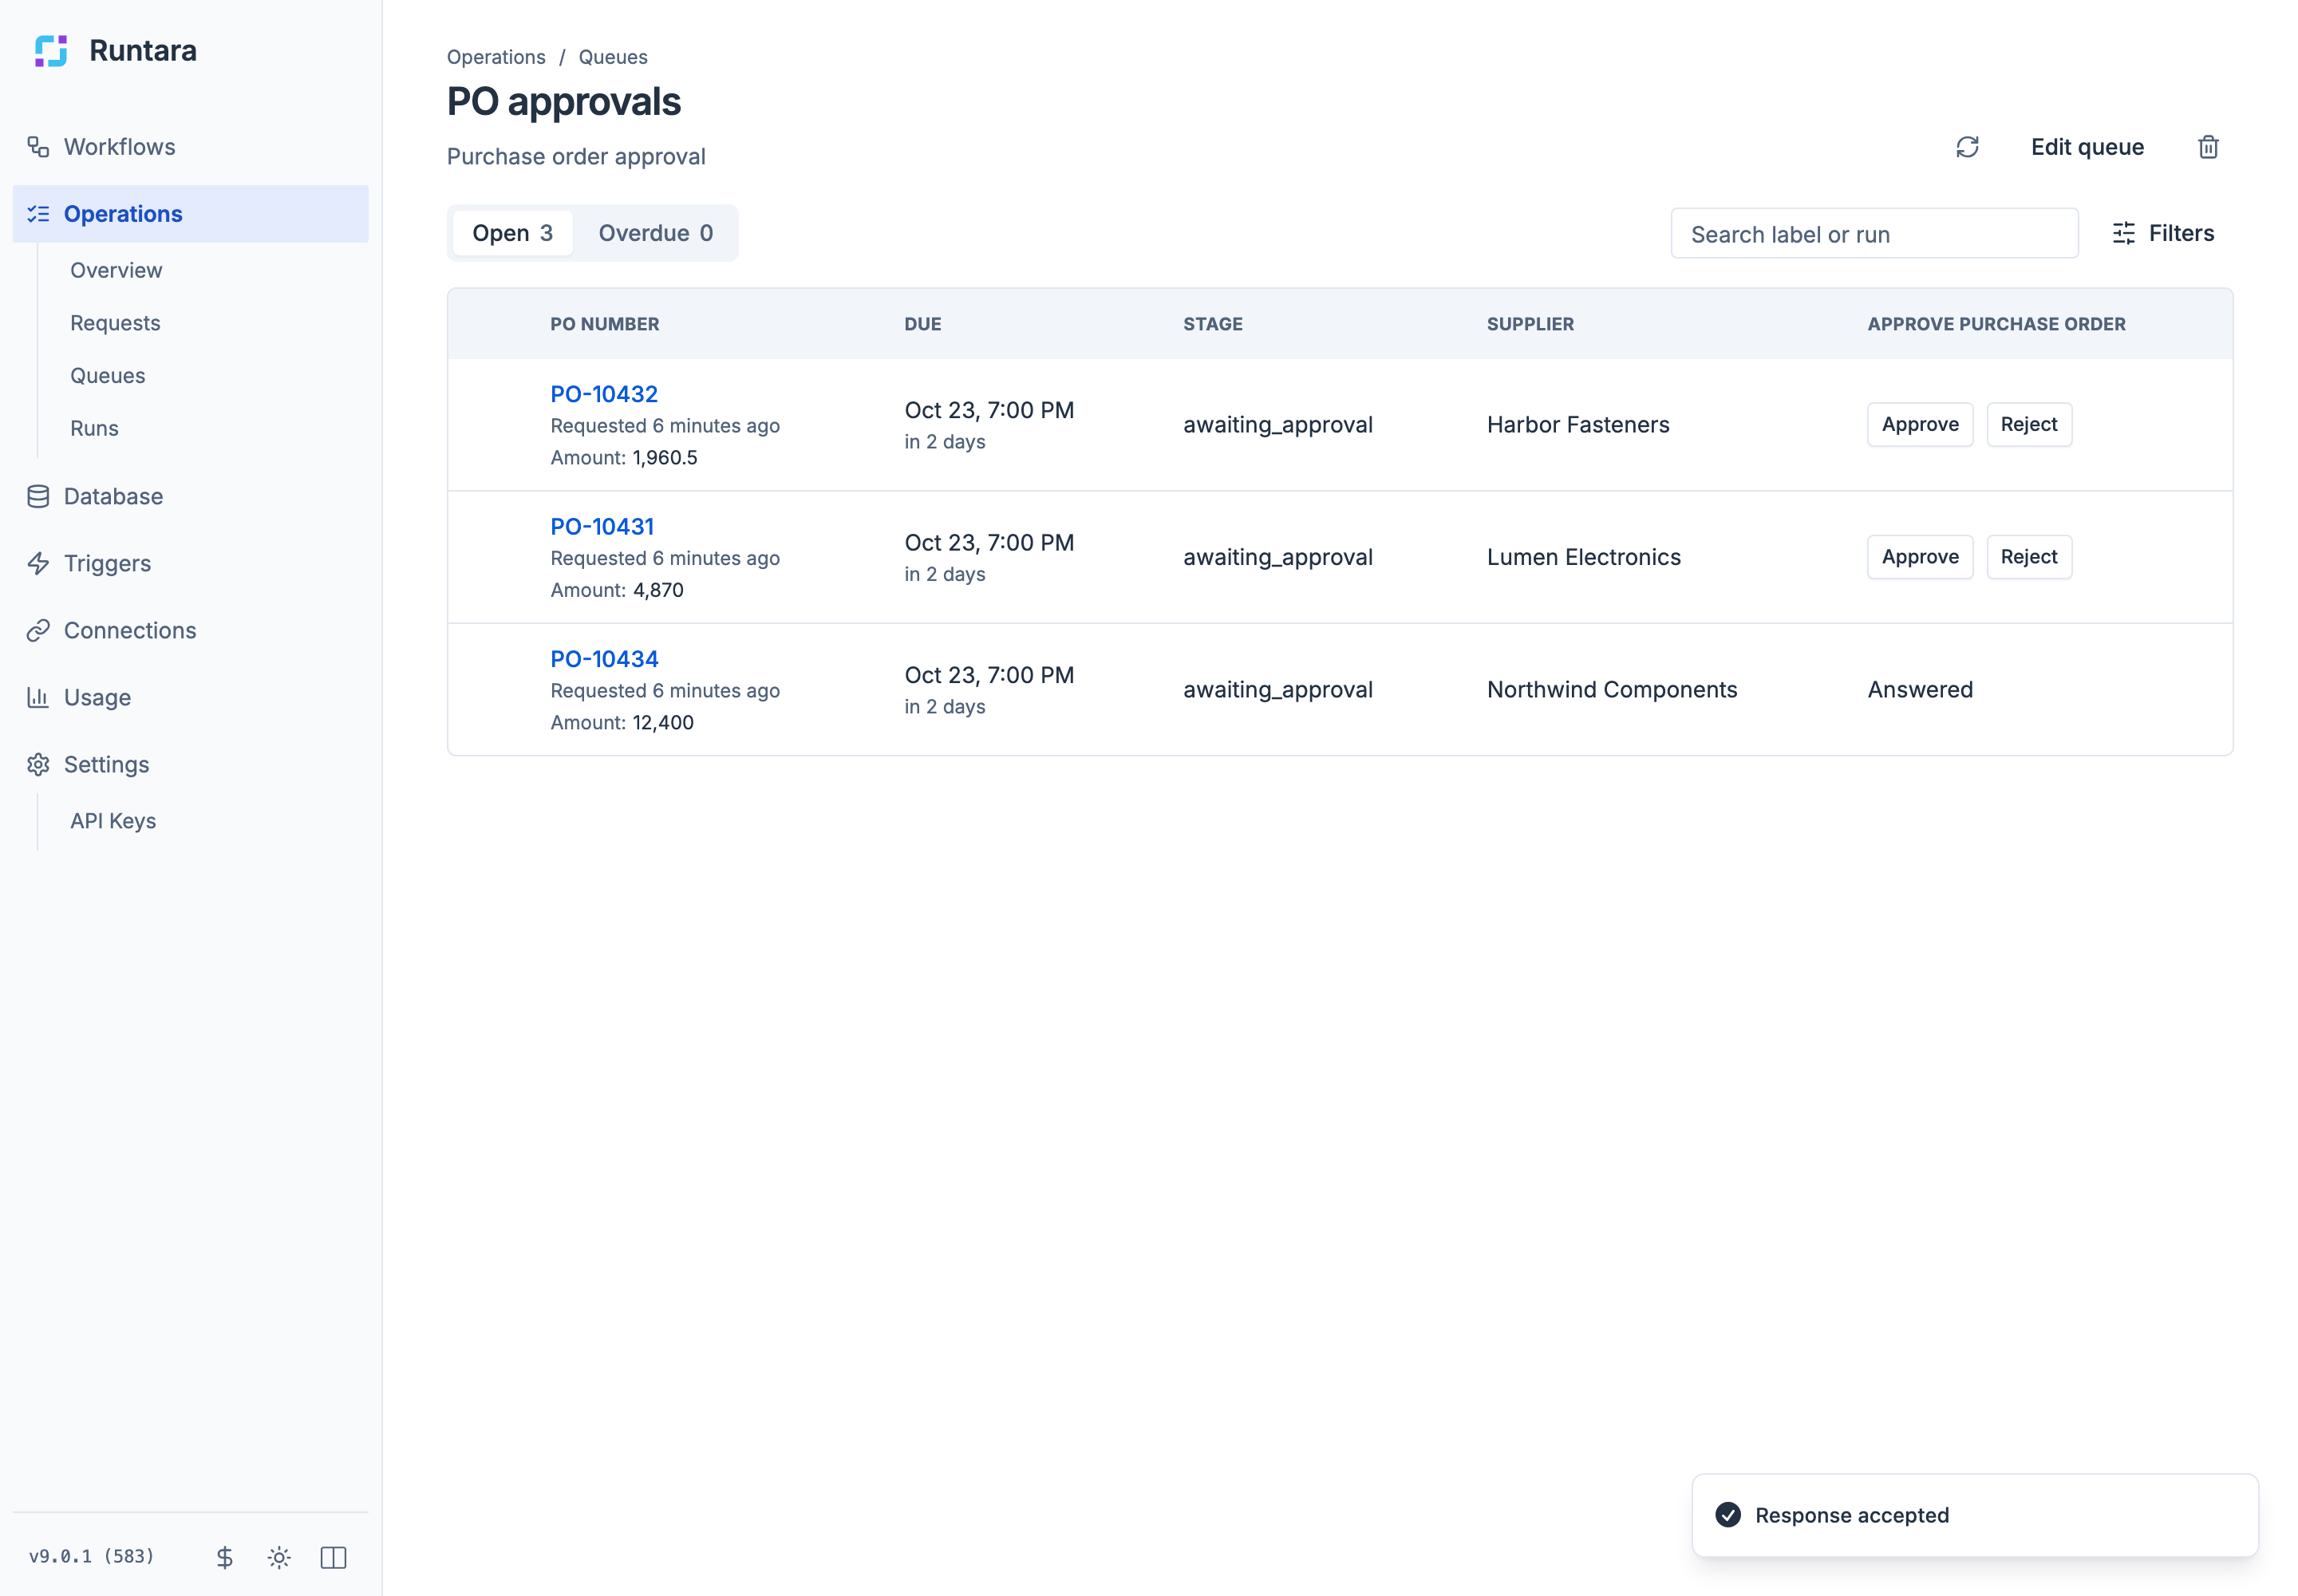
If the connection drops before the answer is confirmed, the row shows Not confirmed — retry below with a Retry original response button. Retrying sends the same answer and can never answer twice. The first accepted answer wins.
The Requests page
Operations > Requests lists every open request across all workflows, grouped by workflow, 25 per page.
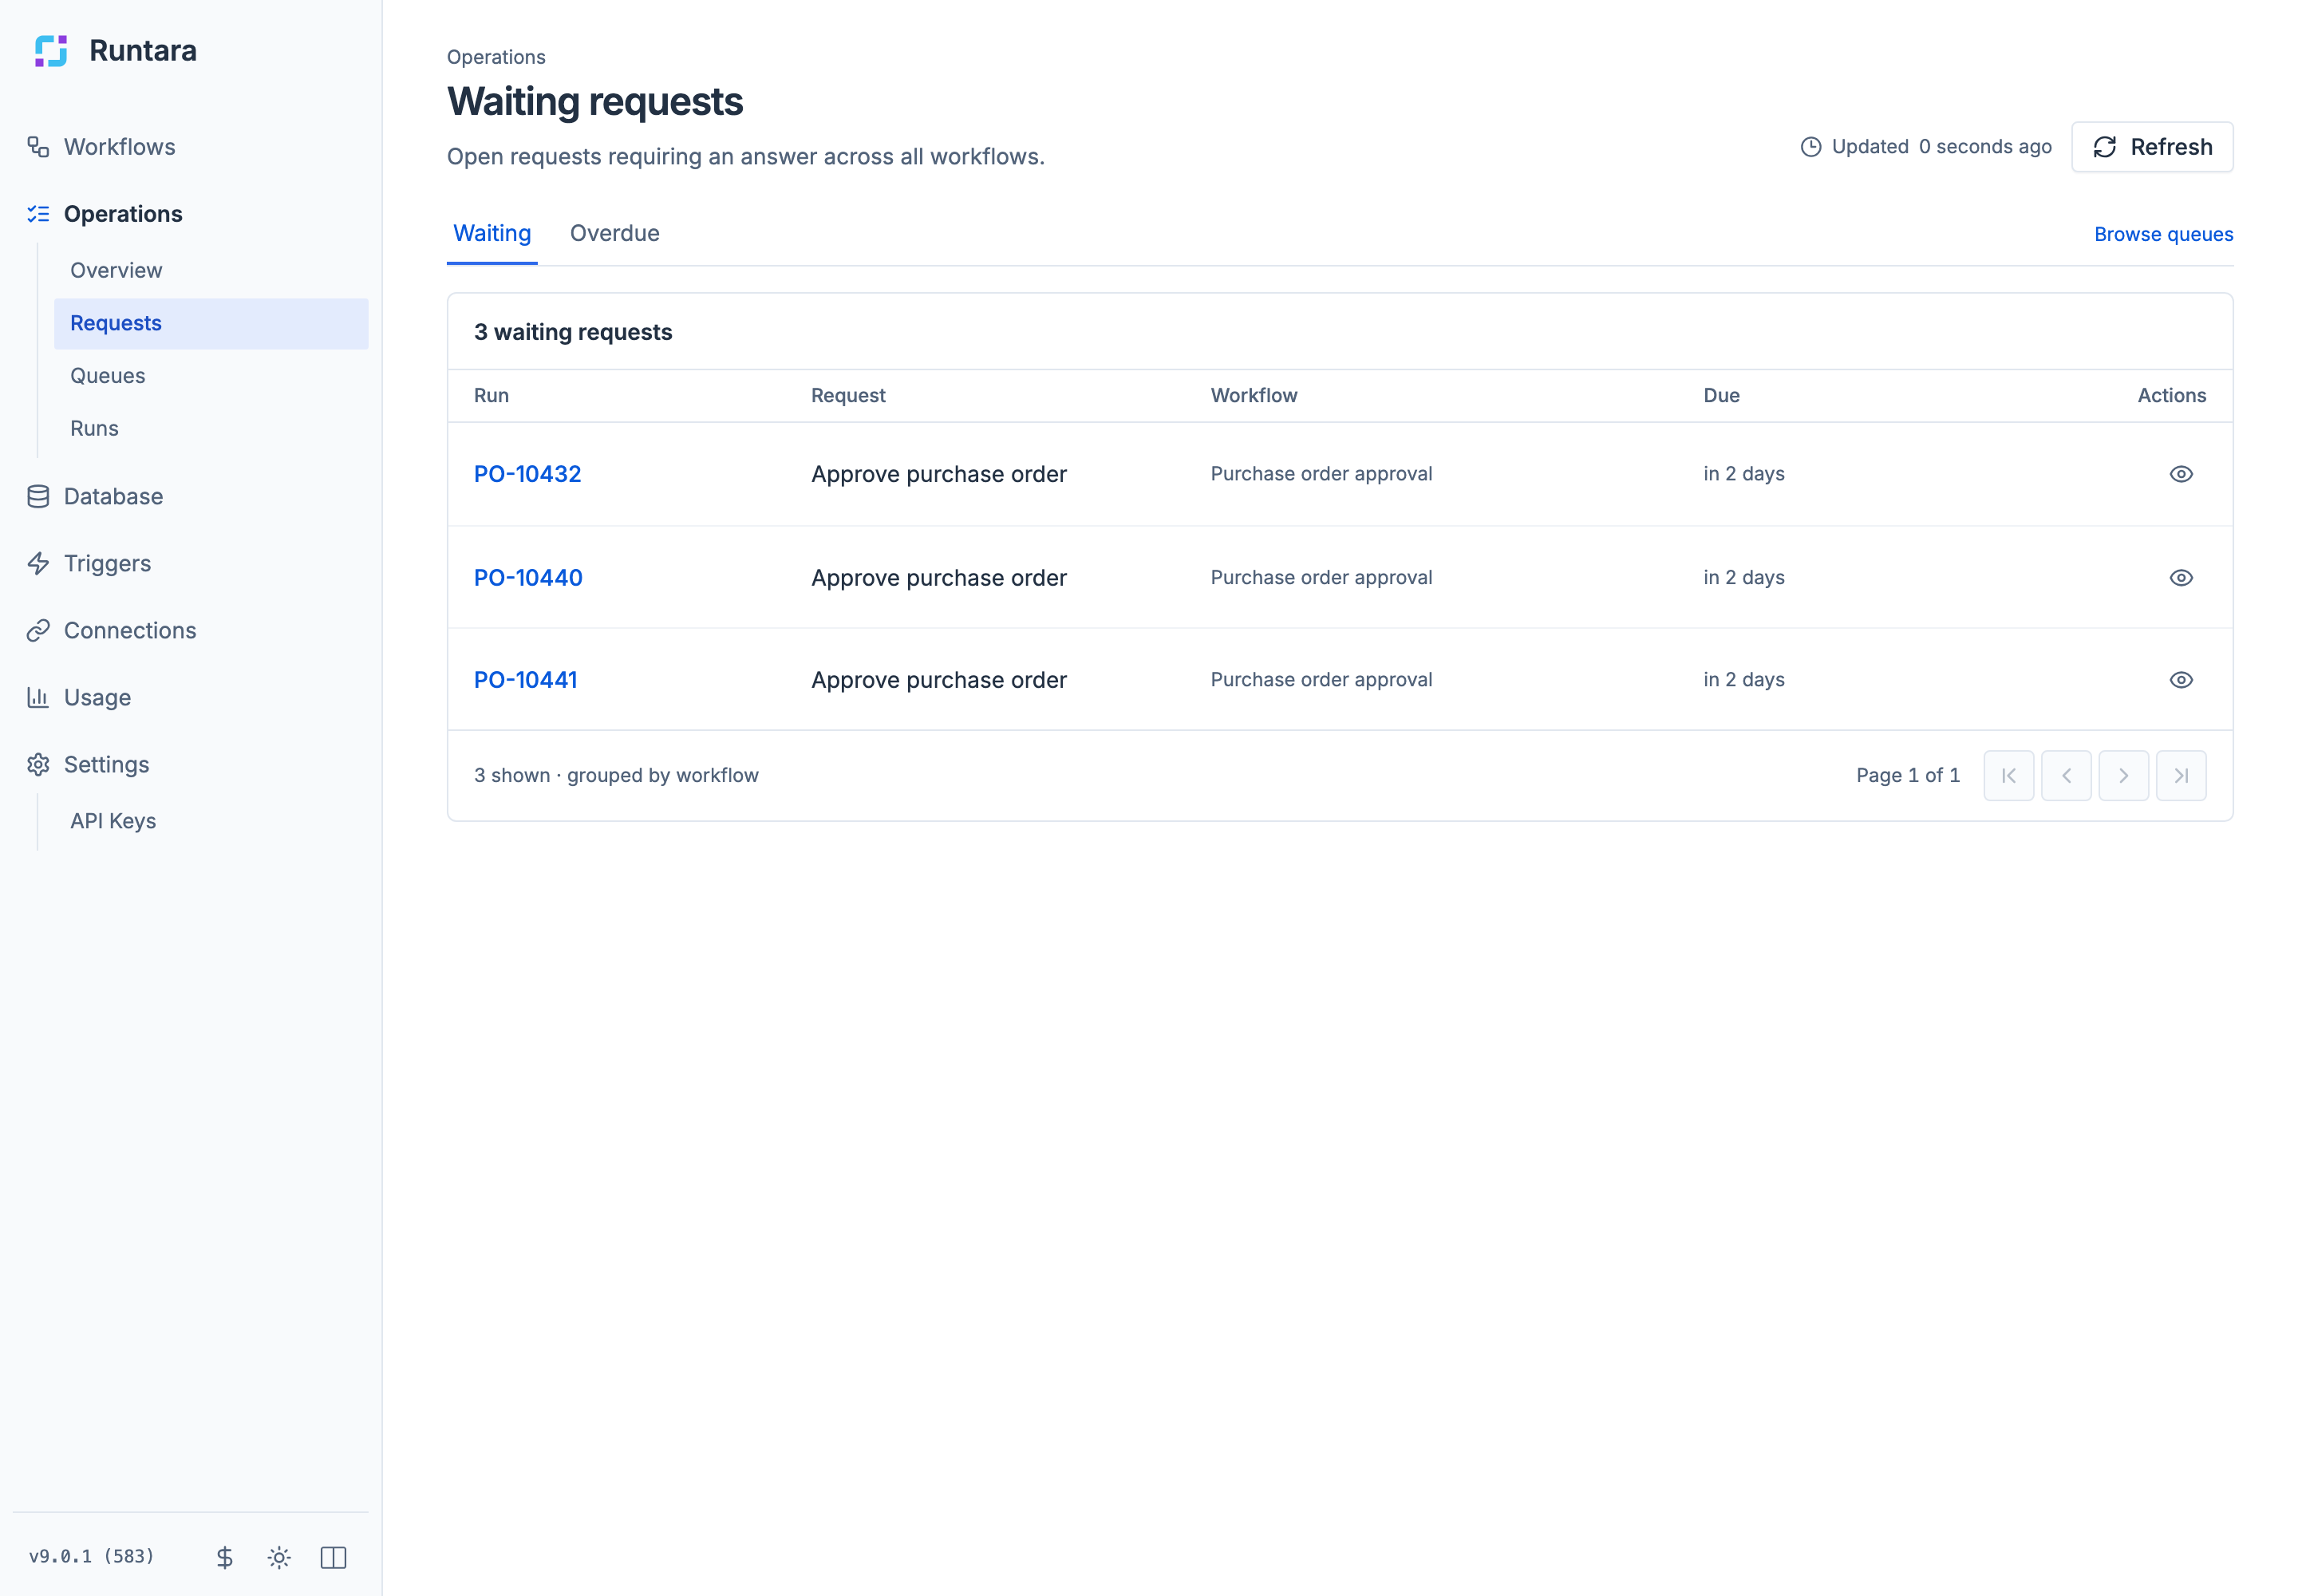
- Waiting shows all open requests. Overdue shows only requests past the due time set in their queue.
- Columns are Run, Request, Workflow, Due, and Actions.
- Review request (eye icon) opens the run page, where you answer. The Requests page itself has no answer buttons; use a queue for one-click answers.
- Browse queues opens the Queues page.
Requests appear here automatically. You do not need to create a queue first.
Queues
Operations > Queues lists the saved queues. Each row shows the queue name, its workflow, and whether it holds open requests or runs.
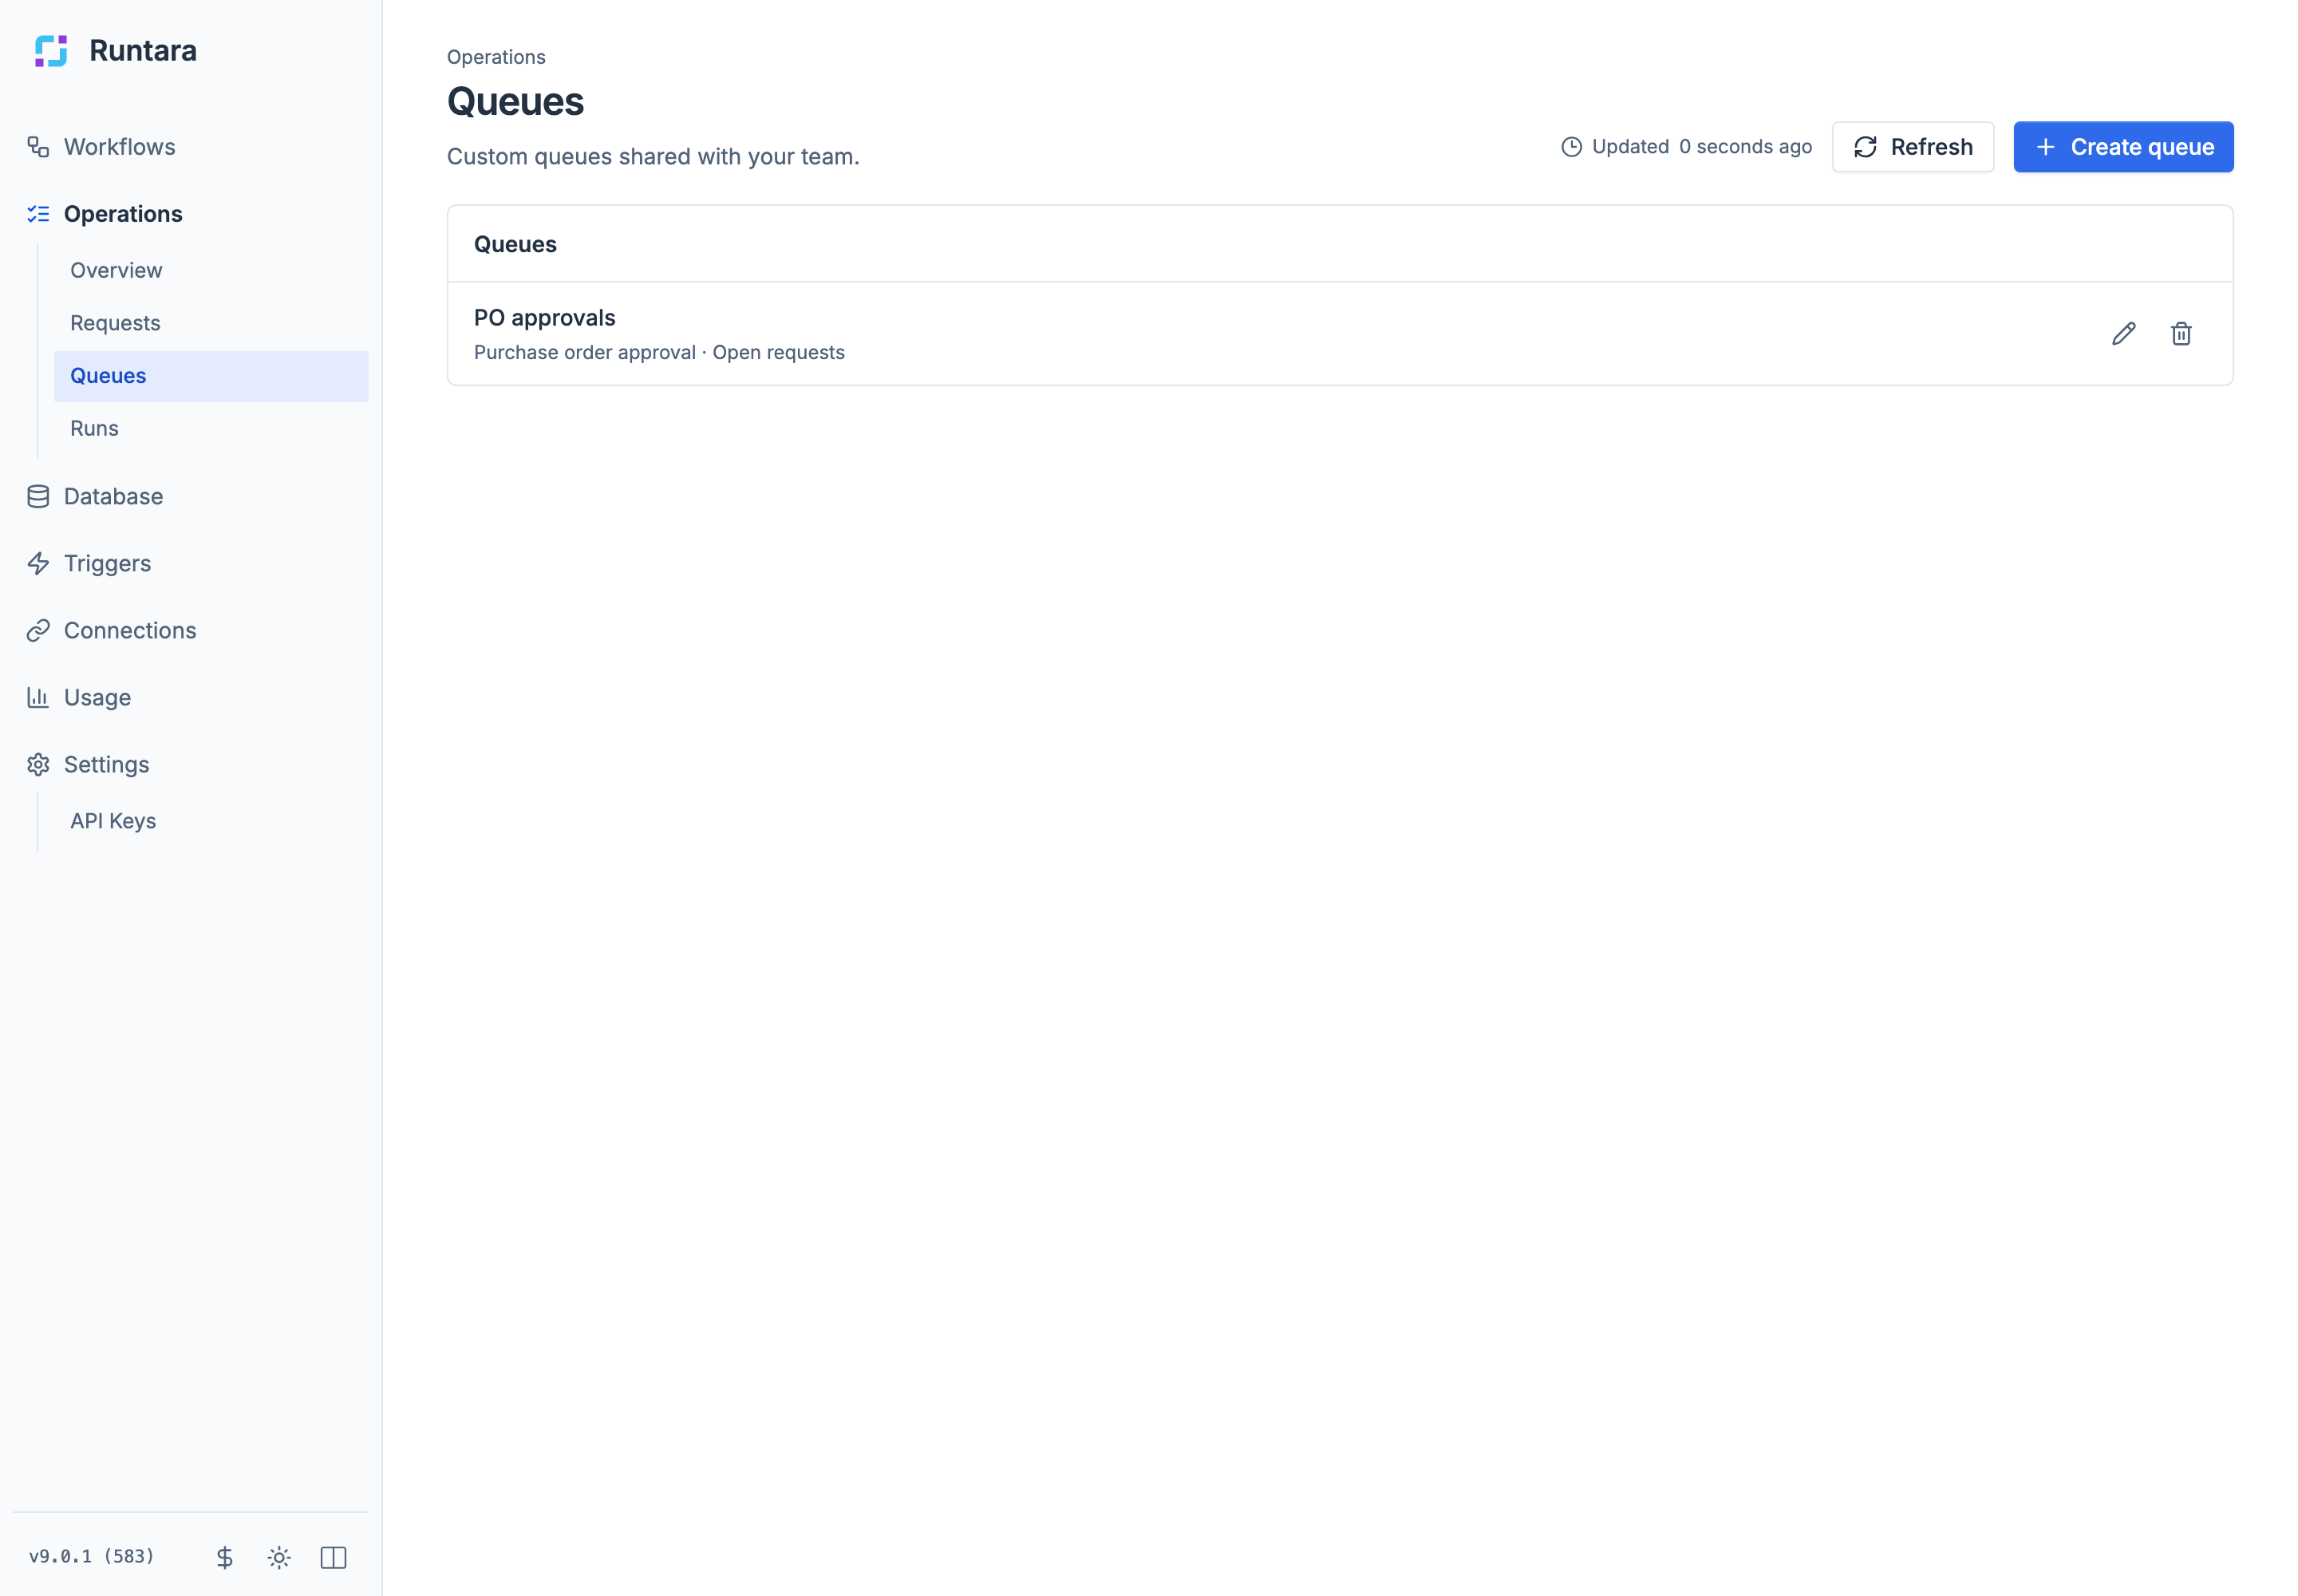 Use the pencil icon to edit a queue and the trash icon to delete it. Deleting asks for confirmation and removes only the saved configuration.
Create a queue
- Open Operations > Queues and select Create queue.
- Choose the Workflow. The workflow cannot be changed later.
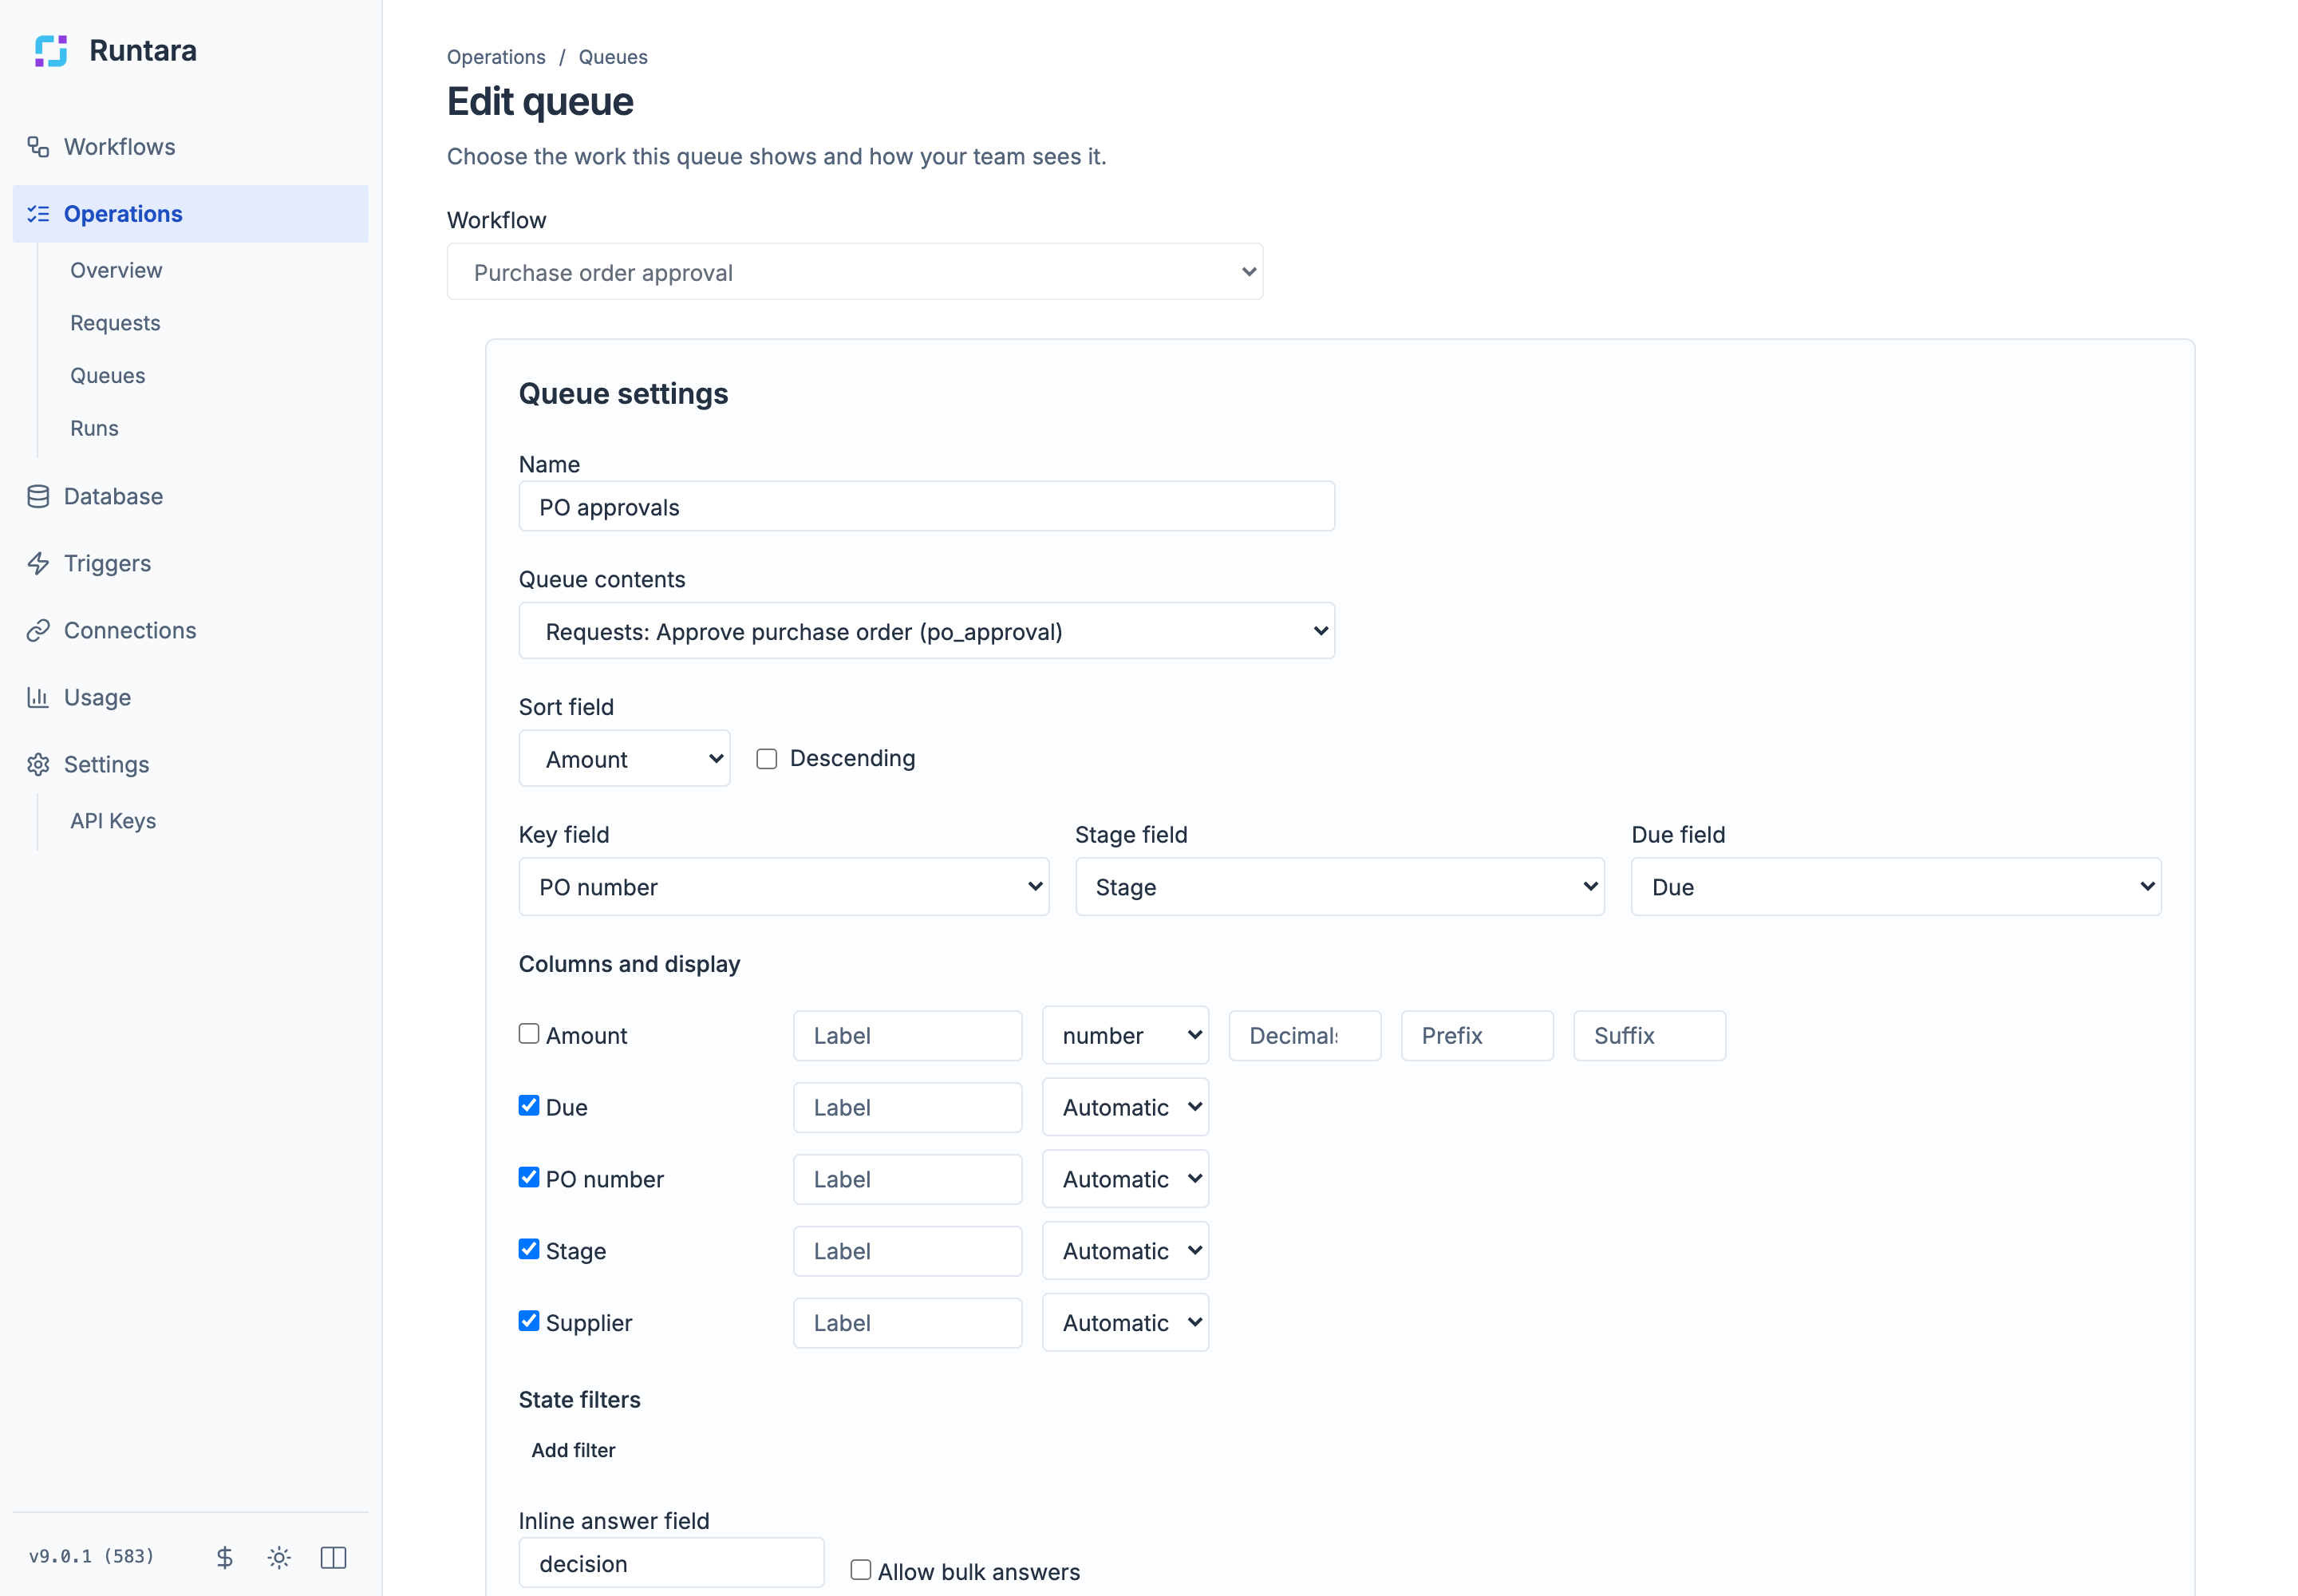
- Fill in the Queue settings that appear:
| Setting | What it does |
|---|---|
| Name | The queue name. Defaults to “workflow name queue”. |
| Queue contents | Requests: step name (action key) shows that step’s open requests. Workflow runs shows runs instead. A key that only exists in an older version is listed as “(older requests)”, so work started before a change is never hidden. |
| Run status | Only for Workflow runs. Choose which statuses to include. No selection includes all. |
| Sort field | The default order, or any state field. Tick Descending to reverse it. |
| Key field | The value shown as the row identifier. Defaults to the run label. |
| Stage field | A state field with allowed values. Drives the stage stepper on the run page. |
| Due field | A date-time state field. Drives due dates, the Overdue tab, and the Overdue tile on the overview. |
| Columns and display | One line per state field. Tick a field to show it as a column, override its Label, and choose a display format: Automatic, text, number, date, datetime, or relative. Numbers also take Decimals, Prefix, and Suffix. |
| State filters | Conditions every row must meet, for example Amount gte 1000. Operators are eq, ne, lt, lte, gt, gte, and exists. Compare with now compares a date field with the current time. Up to 16 filters. |
| Inline answer field | For request queues. The response field to answer from the row, for example decision. Leave empty to make each row a Review link to the run page instead. |
| Allow bulk answers | For request queues. Adds checkboxes and bulk answer buttons. Needs an inline answer field. |
- Select Create queue.
Work in a queue
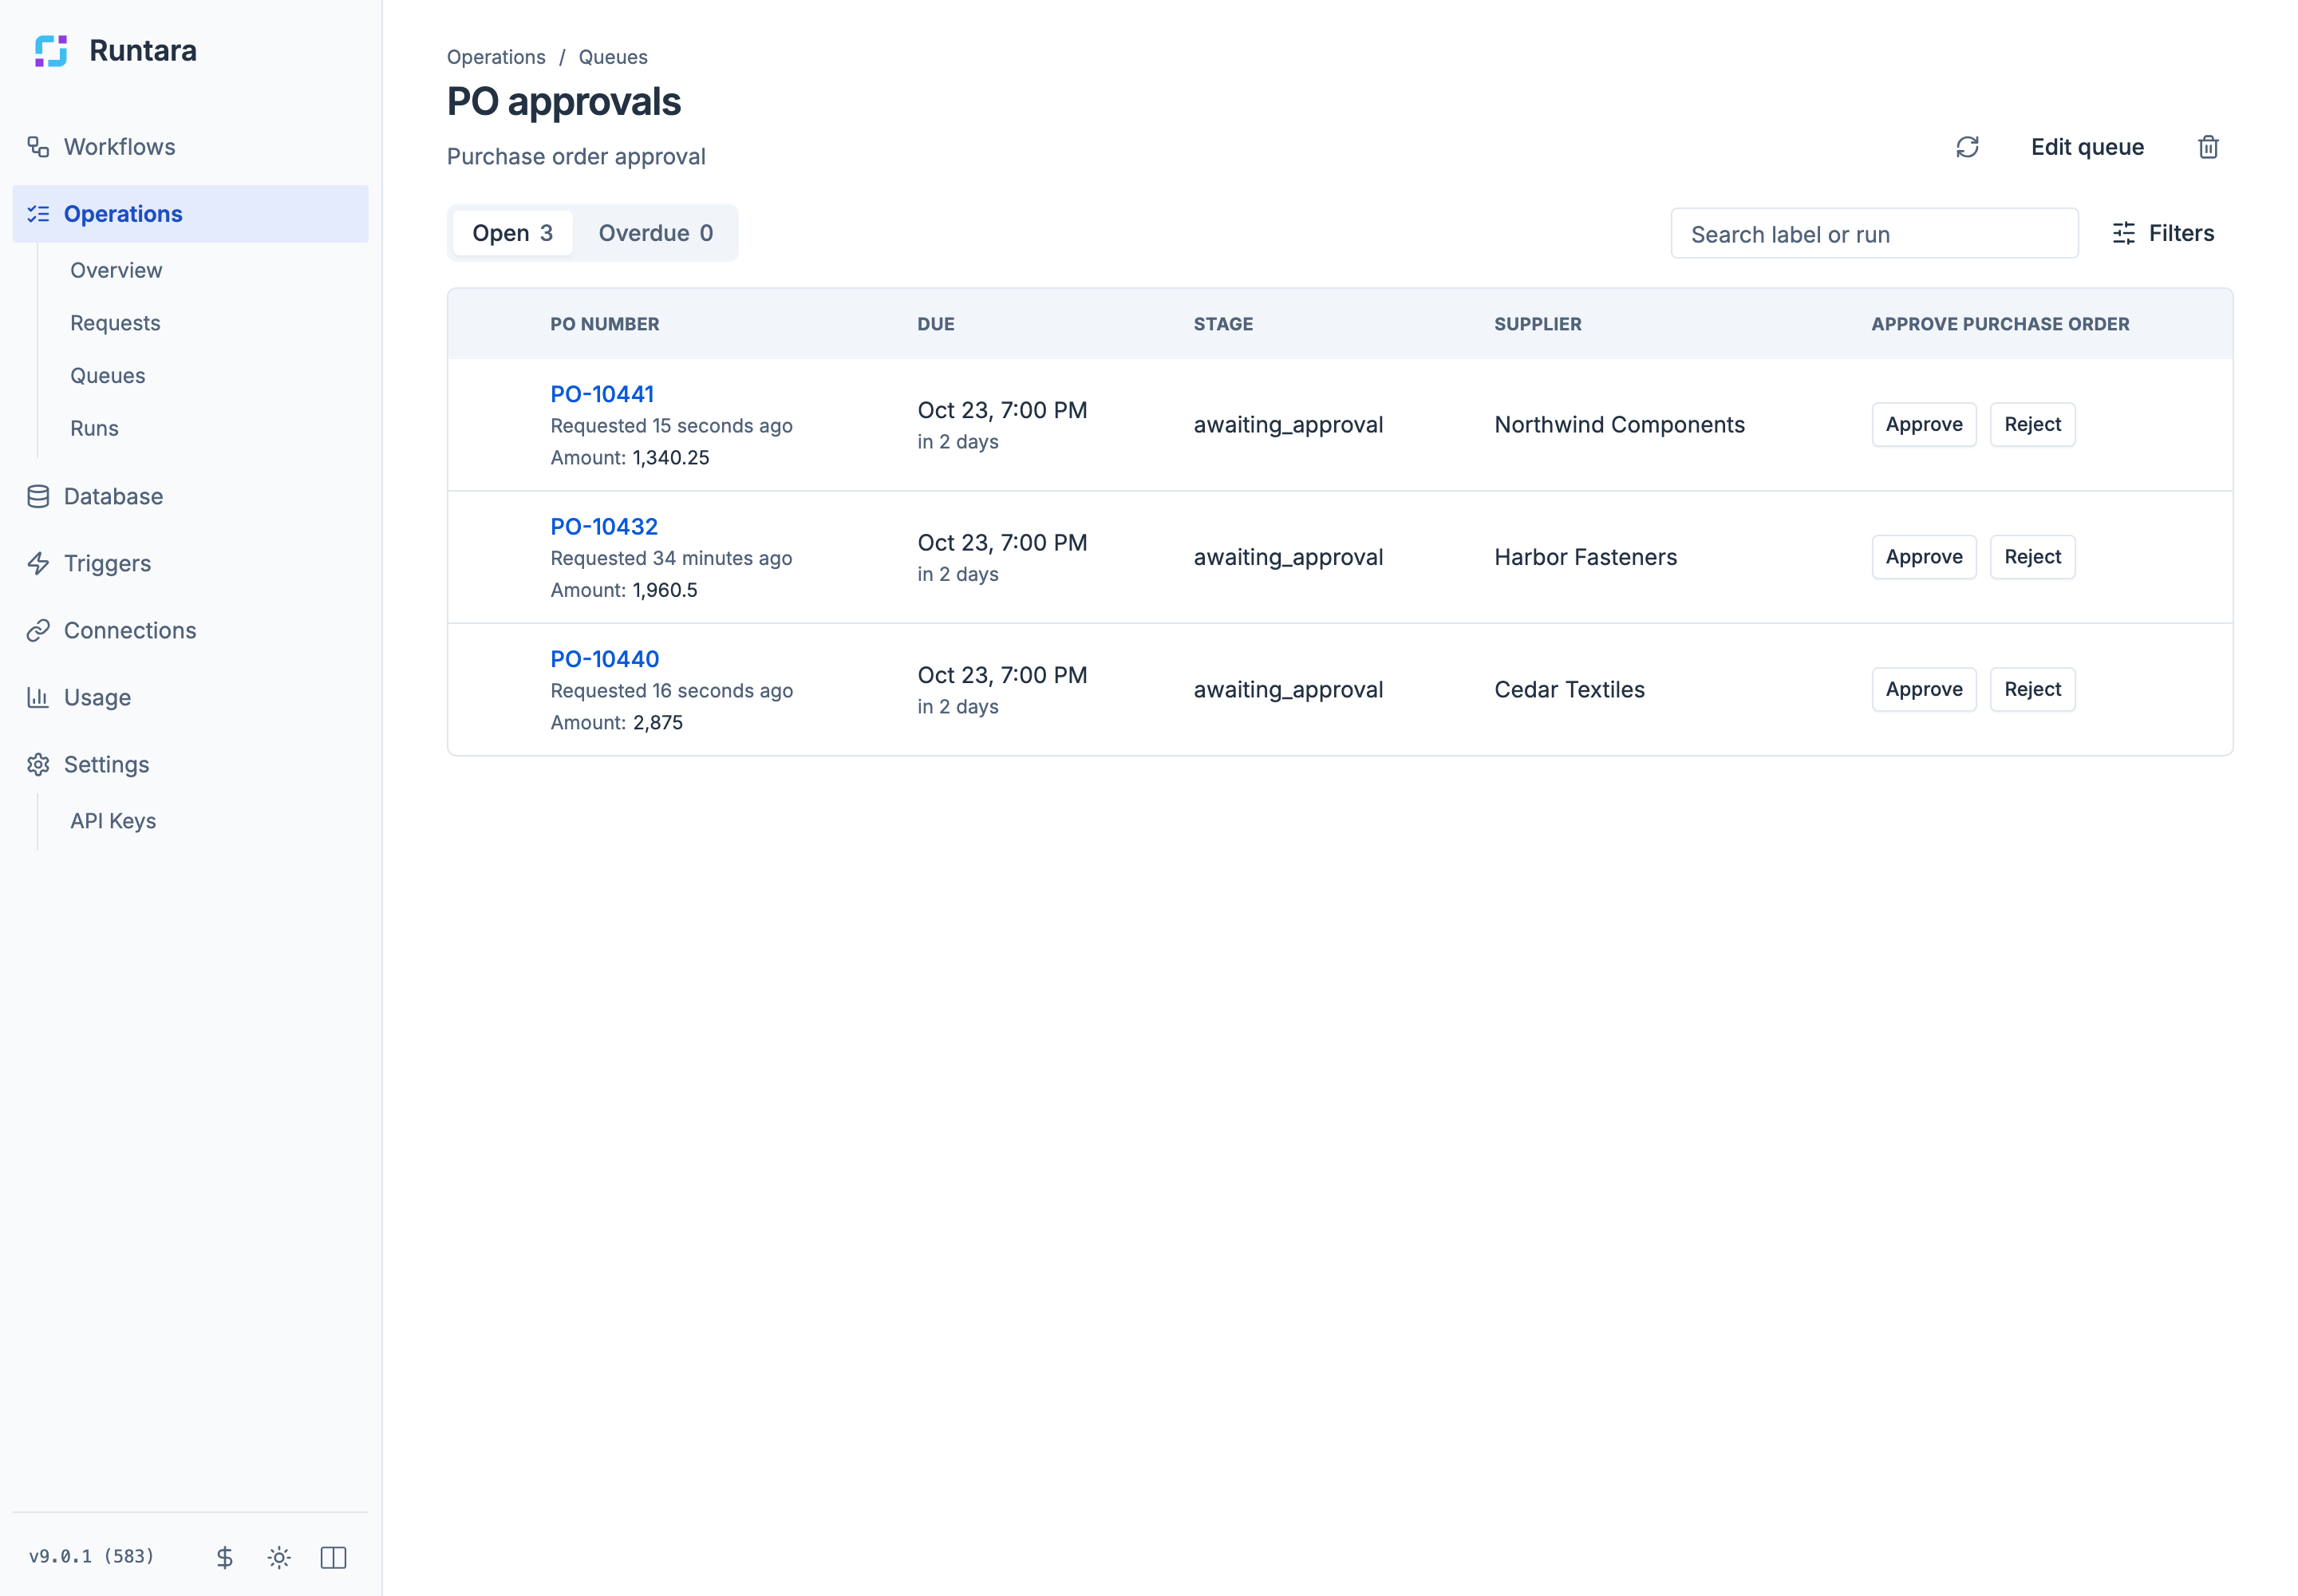
- Open and Overdue tabs show counts. Overdue appears only when the queue has a due field.
- Search label or run finds rows by run label or run ID.
- Filters adds temporary state filters for your own view. They are not saved to the queue.
- Select a column header to sort by it. Select again to reverse, and a third time to clear.
- Each row shows the key (linked to the run page), when it was requested, its deadline if the step has a timeout, the action context, and the state columns.
- The last column holds the answer buttons. Its header is the request name.
When an answer needs more than one field, the row expands. In the example, rejecting requires a reason:
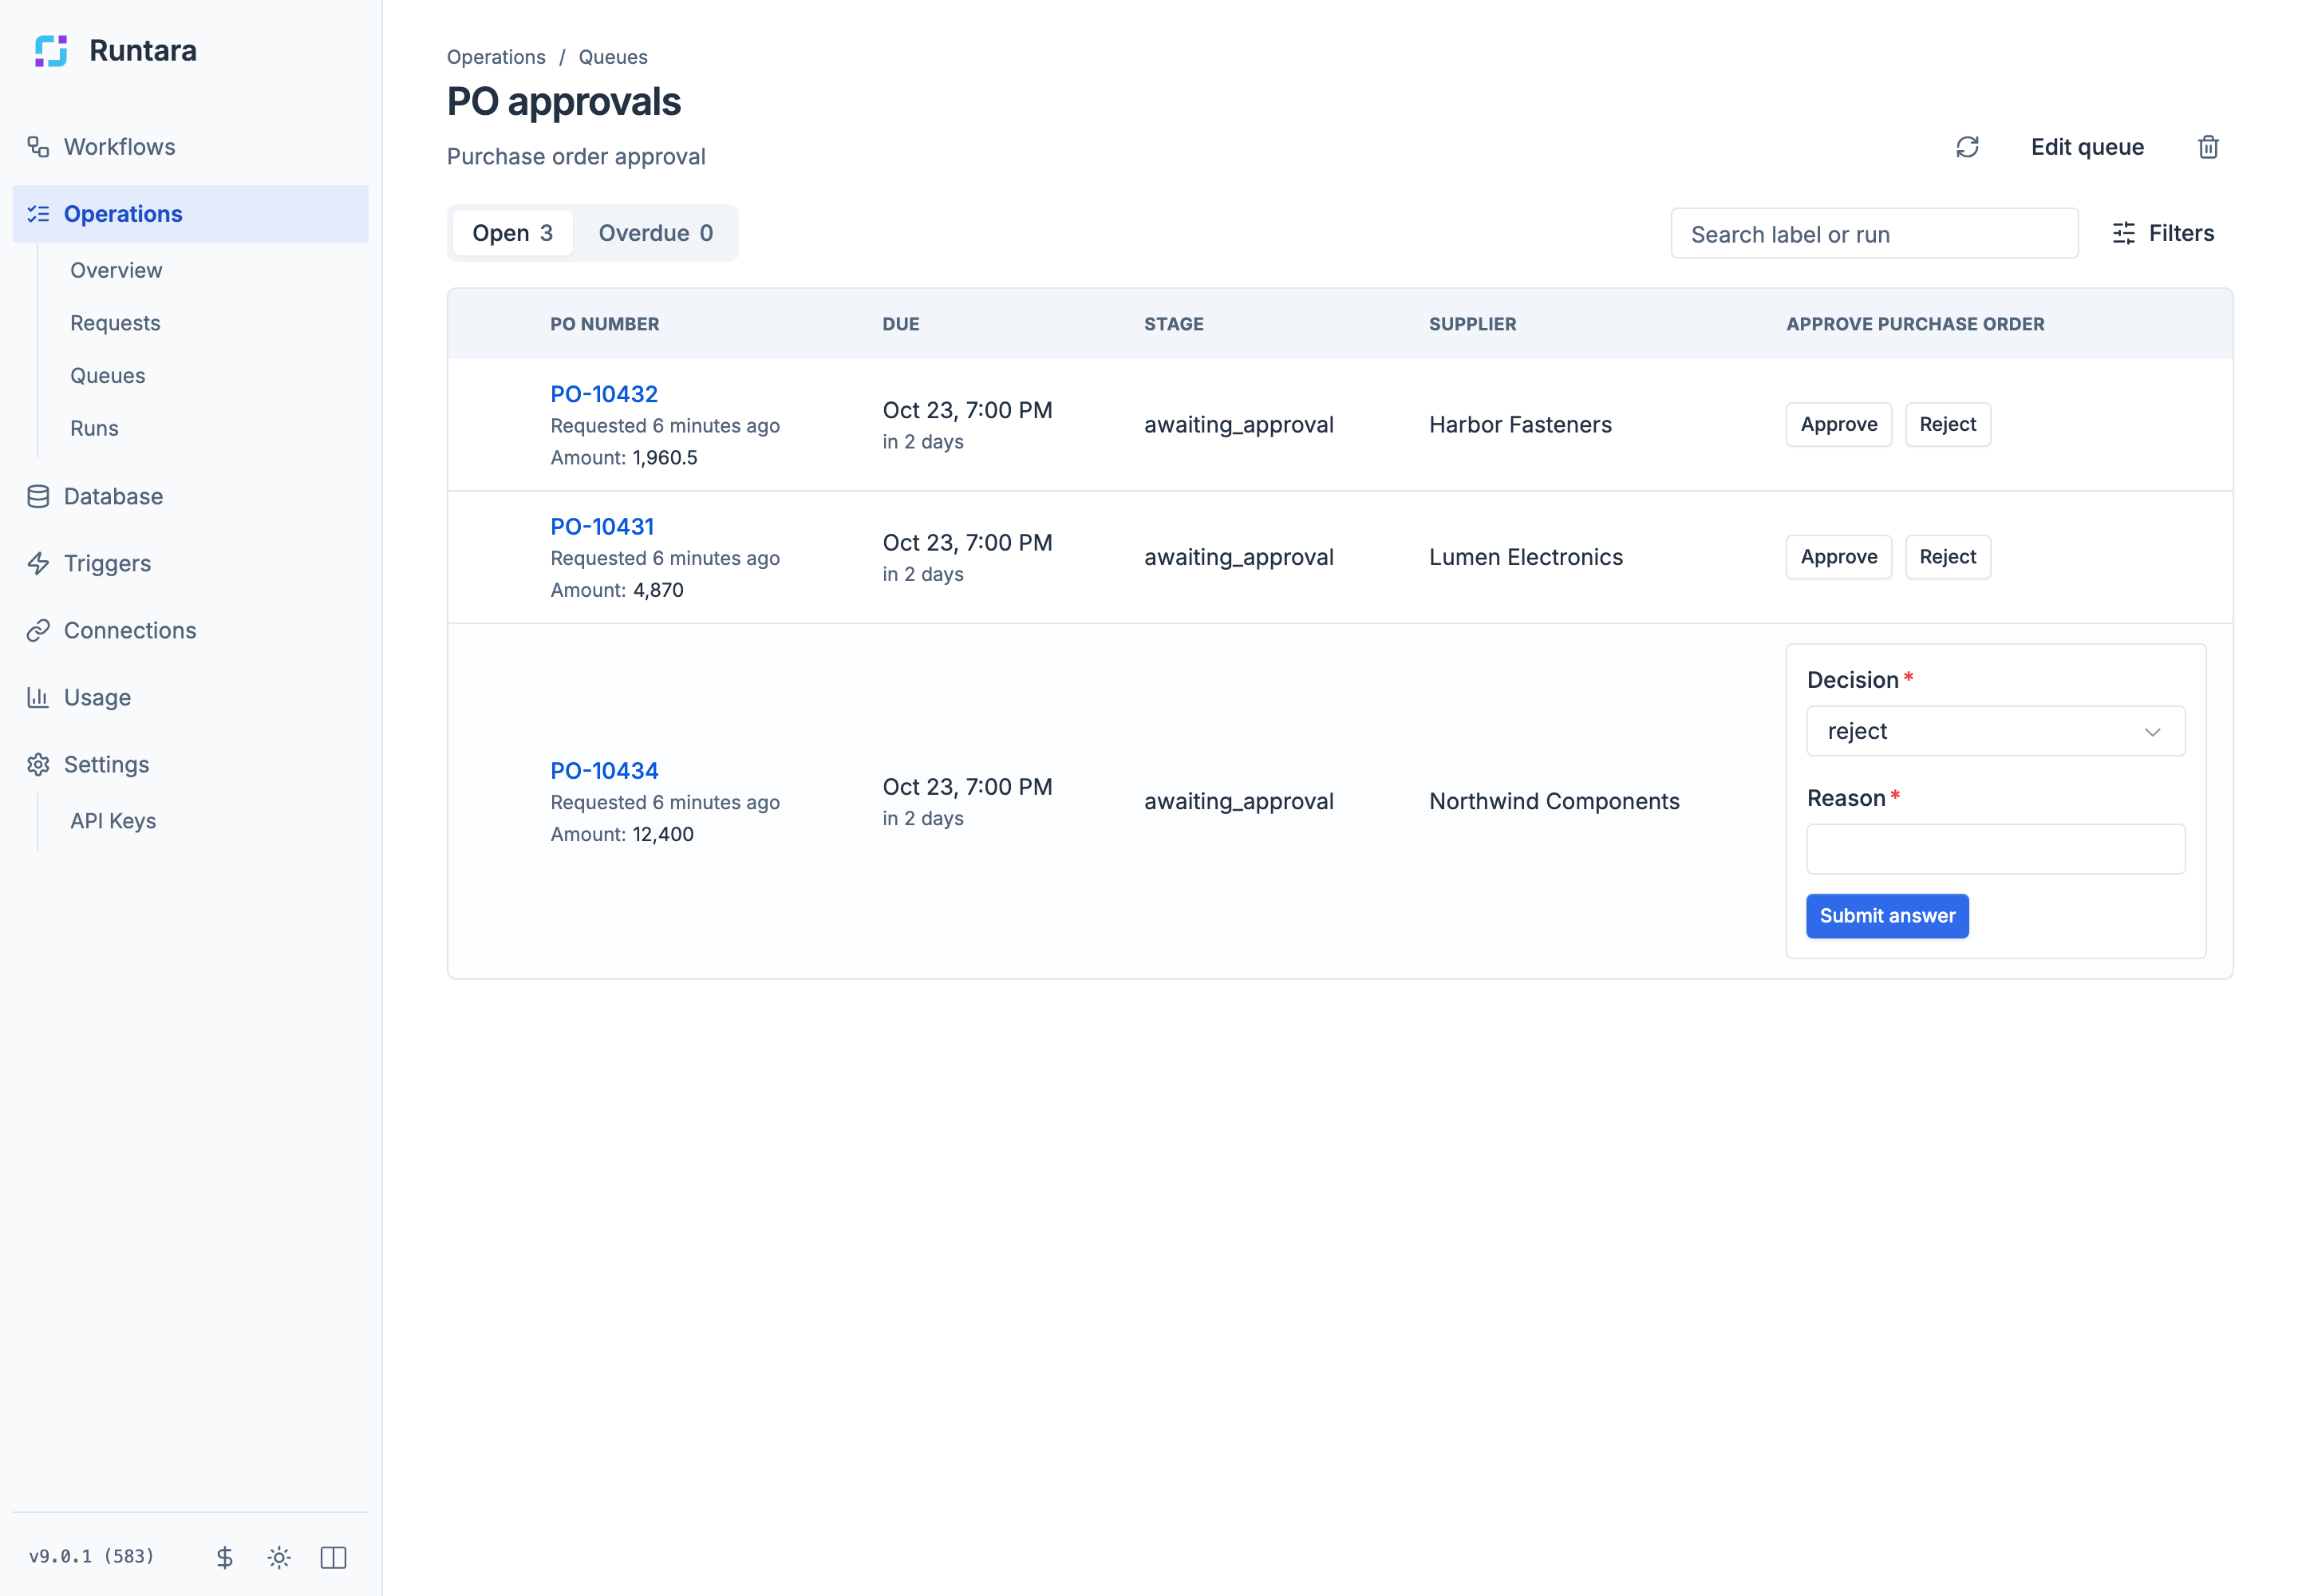
Use Edit queue to change the settings and the trash icon to delete the queue.
Track due dates and overdue work
Runtara has two kinds of time limit:
- A step timeout is enforced: the step fails if nobody answers in time. Queue rows show it as deadline.
- A queue due date is informational: it comes from a date-time state field chosen as the queue’s Due field, and the run keeps waiting after it passes. Overdue requests appear in the Overdue tab, on the Requests page’s Overdue tab, and in the Overdue tile on the overview.
To track due dates, publish a date-time state field from the workflow (for example with a Set State step) and choose it as the Due field in the queue settings.
Related
- Operations overview
- Runs
- Workflow steps: the Wait for Signal and Set State steps.